python 线程间通信用什么手段
爱喝马黛茶的安东尼
2019-11-29 09:55:003228浏览 · 0收藏 · 0评论

线程间通信的几种实现方式
首先,要短信线程间通信的模型有两种:共享内存和消息传递,以下方式都是基本这两种模型来实现的。我们来基本一道面试常见的题目来分析:
题目:有两个线程A、B,A线程向一个集合里面依次添加元素"abc"字符串,一共添加十次,当添加到第五次的时候,希望B线程能够收到A线程的通知,然后B线程执行相关的业务操作。
方式一:使用volatile关键字
基于 volatile 关键字来实现线程间相互通信是使用共享内存的思想,大致意思就是多个线程同时监听一个变量,当这个变量发生变化的时候 ,线程能够感知并执行相应的业务。这也是最简单的一种实现方式。
public class TestSync {
    // 定义一个共享变量来实现通信,它需要是volatile修饰,否则线程不能及时感知
    static volatile boolean notice = false;
    public static void main(String[] args) {
        List<String>  list = new ArrayList<>();
        // 实现线程A
        Thread threadA = new Thread(() -> {
            for (int i = 1; i <= 10; i++) {
                list.add("abc");
                System.out.println("线程A向list中添加一个元素,此时list中的元素个数为:"+list.size());
                try {
                    Thread.sleep(500);
                } catch (InterruptedException e) {
                    e.printStackTrace();
                }
                if (list.size() == 5)
                    notice = true;
            }
        });
        // 实现线程B
        Thread threadB = new Thread(() -> {
            while (true) {
                if (notice) {
                    System.out.println("线程B收到通知,开始执行自己的业务...");
                    break;
                }
            }
        });
        // 需要先启动线程B
        threadB.start();
        try {
            Thread.sleep(1000);
        } catch (InterruptedException e) {
            e.printStackTrace();
        }
        // 再启动线程A
        threadA.start();
    }
}
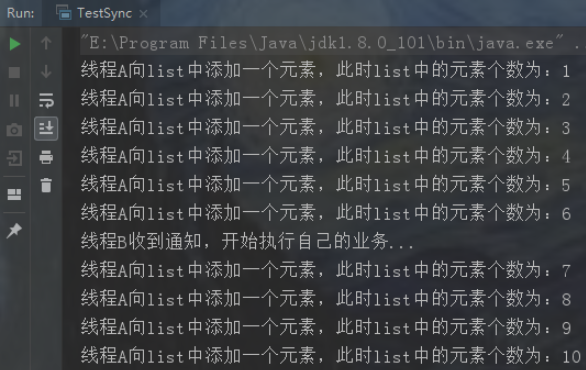
运行结果为:
方式二:使用Object类的wait()和notify()方法
众所周知,Object类提供了线程间通信的方法:wait()、notify()、notifyaAl(),它们是多线程通信的基础,而这种实现方式的思想自然是线程间通信。
注意: wait和 notify必须配合synchronized使用,wait方法释放锁,notify方法不释放锁。
public class TestSync {
    public static void main(String[] args) {
        // 定义一个锁对象
        Object lock = new Object();
        List<String>  list = new ArrayList<>();
        // 实现线程A
        Thread threadA = new Thread(() -> {
            synchronized (lock) {
                for (int i = 1; i <= 10; i++) {
                    list.add("abc");
                    System.out.println("线程A向list中添加一个元素,此时list中的元素个数为:"+
                    list.size());
                    try {
                        Thread.sleep(500);
                    } catch (InterruptedException e) {
                        e.printStackTrace();
                    }
                    if (list.size() == 5)
                        lock.notify();// 唤醒B线程
                }
            }
        });
        // 实现线程B
        Thread threadB = new Thread(() -> {
            while (true) {
                synchronized (lock) {
                    if (list.size() != 5) {
                        try {
                            lock.wait();
                        } catch (InterruptedException e) {
                            e.printStackTrace();
                        }
                    }
                    System.out.println("线程B收到通知,开始执行自己的业务...");
                }
            }
        });
        // 需要先启动线程B
        threadB.start();
        try {
            Thread.sleep(1000);
        } catch (InterruptedException e) {
            e.printStackTrace();
        }
        // 再启动线程A
        threadA.start();
    }
}
运行结果为:
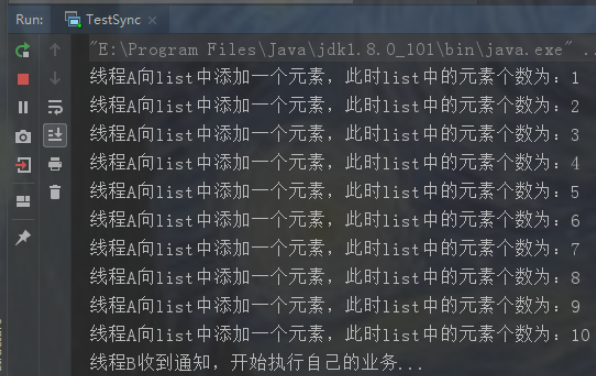
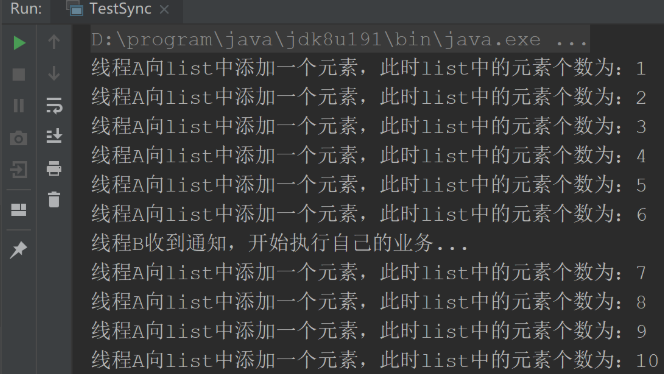
由打印结果截图可知,在线程A发出notify()唤醒通知之后,依然是走完了自己线程的业务之后,线程B才开始执行,这也正好说明了,notify()方法不释放锁,而wait()方法释放锁。
方式三:使用JUC工具类 CountDownLatch
jdk1.5之后在java.util.concurrent包下提供了很多并发编程相关的工具类,简化了我们的并发编程代码的书写,***CountDownLatch***基于AQS框架,相当于也是维护了一个线程间共享变量state。
public class TestSync {
    public static void main(String[] args) {
        CountDownLatch countDownLatch = new CountDownLatch(1);
        List<String>  list = new ArrayList<>();
        // 实现线程A
        Thread threadA = new Thread(() -> {
            for (int i = 1; i <= 10; i++) {
                list.add("abc");
                System.out.println("线程A向list中添加一个元素,此时list中的元素个数为:"+list.size());
                try {
                    Thread.sleep(500);
                } catch (InterruptedException e) {
                    e.printStackTrace();
                }
                if (list.size() == 5)
                    countDownLatch.countDown();
            }
        });
        // 实现线程B
        Thread threadB = new Thread(() -> {
            while (true) {
                if (list.size() != 5) {
                    try {
                        countDownLatch.await();
                    } catch (InterruptedException e) {
                        e.printStackTrace();
                    }
                }
                System.out.println("线程B收到通知,开始执行自己的业务...");
                break;
            }
        });
        // 需要先启动线程B
        threadB.start();
        try {
            Thread.sleep(1000);
        } catch (InterruptedException e) {
            e.printStackTrace();
        }
        // 再启动线程A
        threadA.start();
    }
}
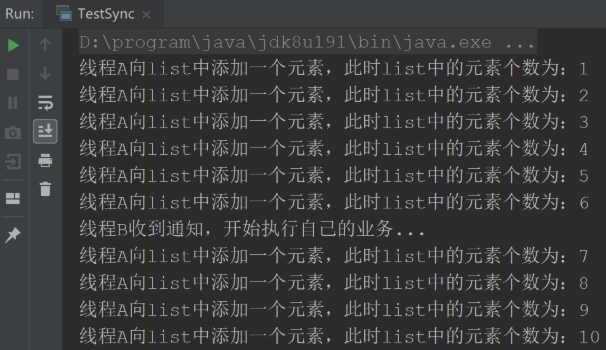
运行结果为:
方法四:使用ReentrantLock结合Condition
public class TestSync {
    public static void main(String[] args) {
        ReentrantLock lock = new ReentrantLock();
        Condition condition = lock.newCondition();
        List<String> list = new ArrayList<>();
        // 实现线程A
        Thread threadA = new Thread(() -> {
            lock.lock();
            for (int i = 1; i <= 10; i++) {
                list.add("abc");
                System.out.println("线程A向list中添加一个元素,此时list中的元素个数为:"+list.size());
                try {
                    Thread.sleep(500);
                } catch (InterruptedException e) {
                    e.printStackTrace();
                }
                if (list.size() == 5)
                    condition.signal();
            }
            lock.unlock();
        });
        // 实现线程B
        Thread threadB = new Thread(() -> {
            lock.lock();
            if (list.size() != 5) {
                try {
                    condition.await();
                } catch (InterruptedException e) {
                    e.printStackTrace();
                }
            }
            System.out.println("线程B收到通知,开始执行自己的业务...");
            lock.unlock();
        });
        threadB.start();
        try {
            Thread.sleep(1000);
        } catch (InterruptedException e) {
            e.printStackTrace();
        }
        threadA.start();
    }
}
运行结果为:
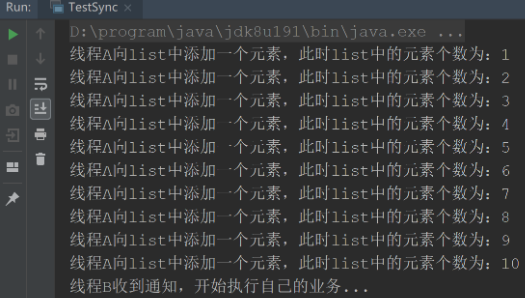
显然这种方式使用起来并不是很好,代码编写复杂,而且线程B在被A唤醒之后由于没有获取锁还是不能立即执行,也就是说,A在唤醒操作之后,并不释放锁。这种方法跟 Object 的 wait() 和 notify() 一样。
方式五:基于LockSupport实现线程间的阻塞和唤醒
LockSupport 是一种非常灵活的实现线程间阻塞和唤醒的工具,使用它不用关注是等待线程先进行还是唤醒线程先运行,但是得知道线程的名字。
public class TestSync {
    public static void main(String[] args) {
        List<String> list = new ArrayList<>();
        // 实现线程B
        final Thread threadB = new Thread(() -> {
            if (list.size() != 5) {
                LockSupport.park();
            }
            System.out.println("线程B收到通知,开始执行自己的业务...");
        });
        // 实现线程A
        Thread threadA = new Thread(() -> {
            for (int i = 1; i <= 10; i++) {
                list.add("abc");
                System.out.println("线程A向list中添加一个元素,此时list中的元素个数为:"+list.size());
                try {
                    Thread.sleep(500);
                } catch (InterruptedException e) {
                    e.printStackTrace();
                }
                if (list.size() == 5)
                    LockSupport.unpark(threadB);
            }
        });
        threadA.start();
        threadB.start();
    }
}
运行结果:
python学习网,大量的免费python视频教程,欢迎在线学习!

关注公众号,随时随地在线学习